PocketBase
PocketBase 是一個方便快速部屬後端資料庫的工具,他用 golang 寫的,因此可以編譯成一個單一執行檔,下載就能使用,內建一個很好看的管理界面,滑鼠點一點就設定好資料庫結構、關聯、使用者驗證和權限控管等功能了
接下來是我用 pocketbase 寫一個貼文佈告欄系統的過程
安裝
安裝很簡單,去 https://pocketbase.io/docs/ 找到你的作業系統對應的檔案,下載下來後放到 $PATH 裡面,在你的專案目錄就執行就可以了
專案結構
執行 pocketbase serve 後會啟動 pocketbase 伺服器,並自動初始化兩個資料夾 pb_data 和 pb_migrations,前者是存放你的資料庫設定、資料、log 的地方,後者是每次更動資料庫(新增刪改表格、欄位等等)時的操作,方便你在不同環境下同步資料庫設定而不損壞資料,還有一個資料夾是 pb_public,你可以把前端程式放在這裡他會幫你放在 / 路徑下
設定 Collection
啟動伺服器後開啟管理頁面 http://localhost:8090/_,他會叫你設定第一個管理員帳號密碼,進入後會發現已經預設一個 users Collection(以下沿用 sqlite 稱呼,稱之為表格),那麼我們就保留他吧。
表格種類
pocketbase 中表格有三種,第一種是一般的 base 基礎表格,就是拿來存資料的,第二種是 auth 驗證表格,對登入驗證有專門的設定,第三種是 view 表格,這個我還沒用過,更多範例可以看官方的 文件
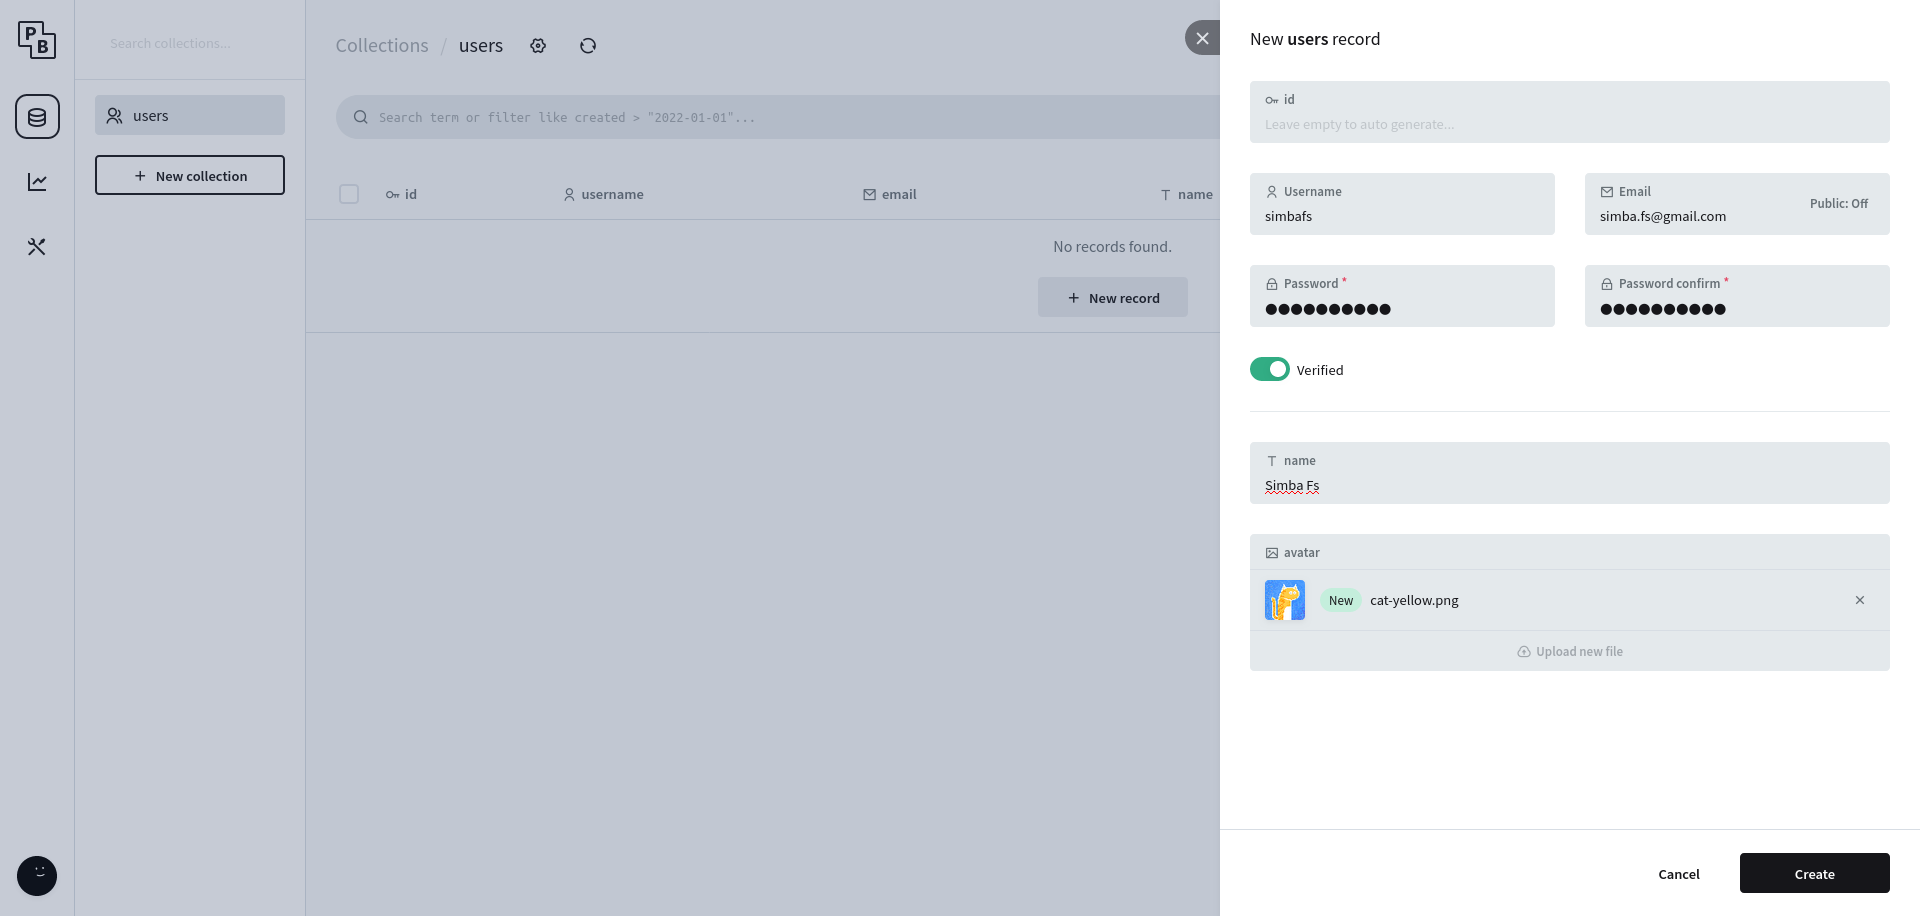
users
這裡 users 應該不用多做調整,先新增一個使用者吧,這裡的使用者是沒有管理員權限的,要設定管理員要到 http://127.0.0.1:8090/_/#/settings/admins
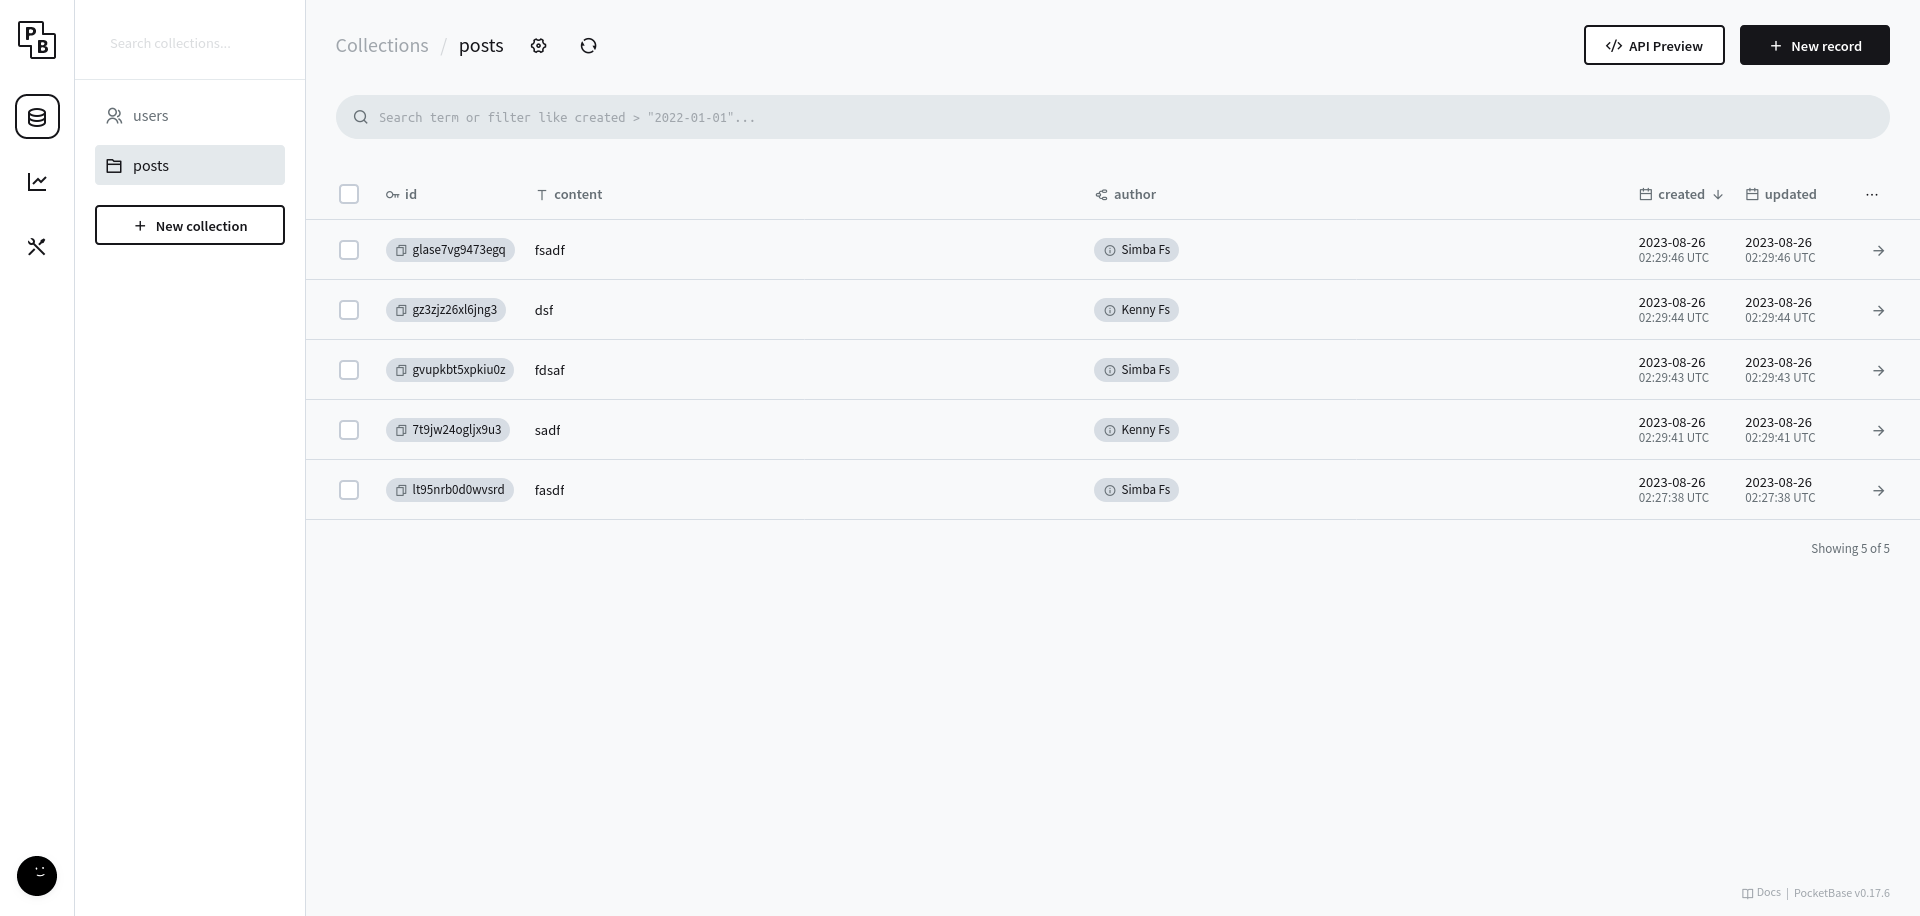
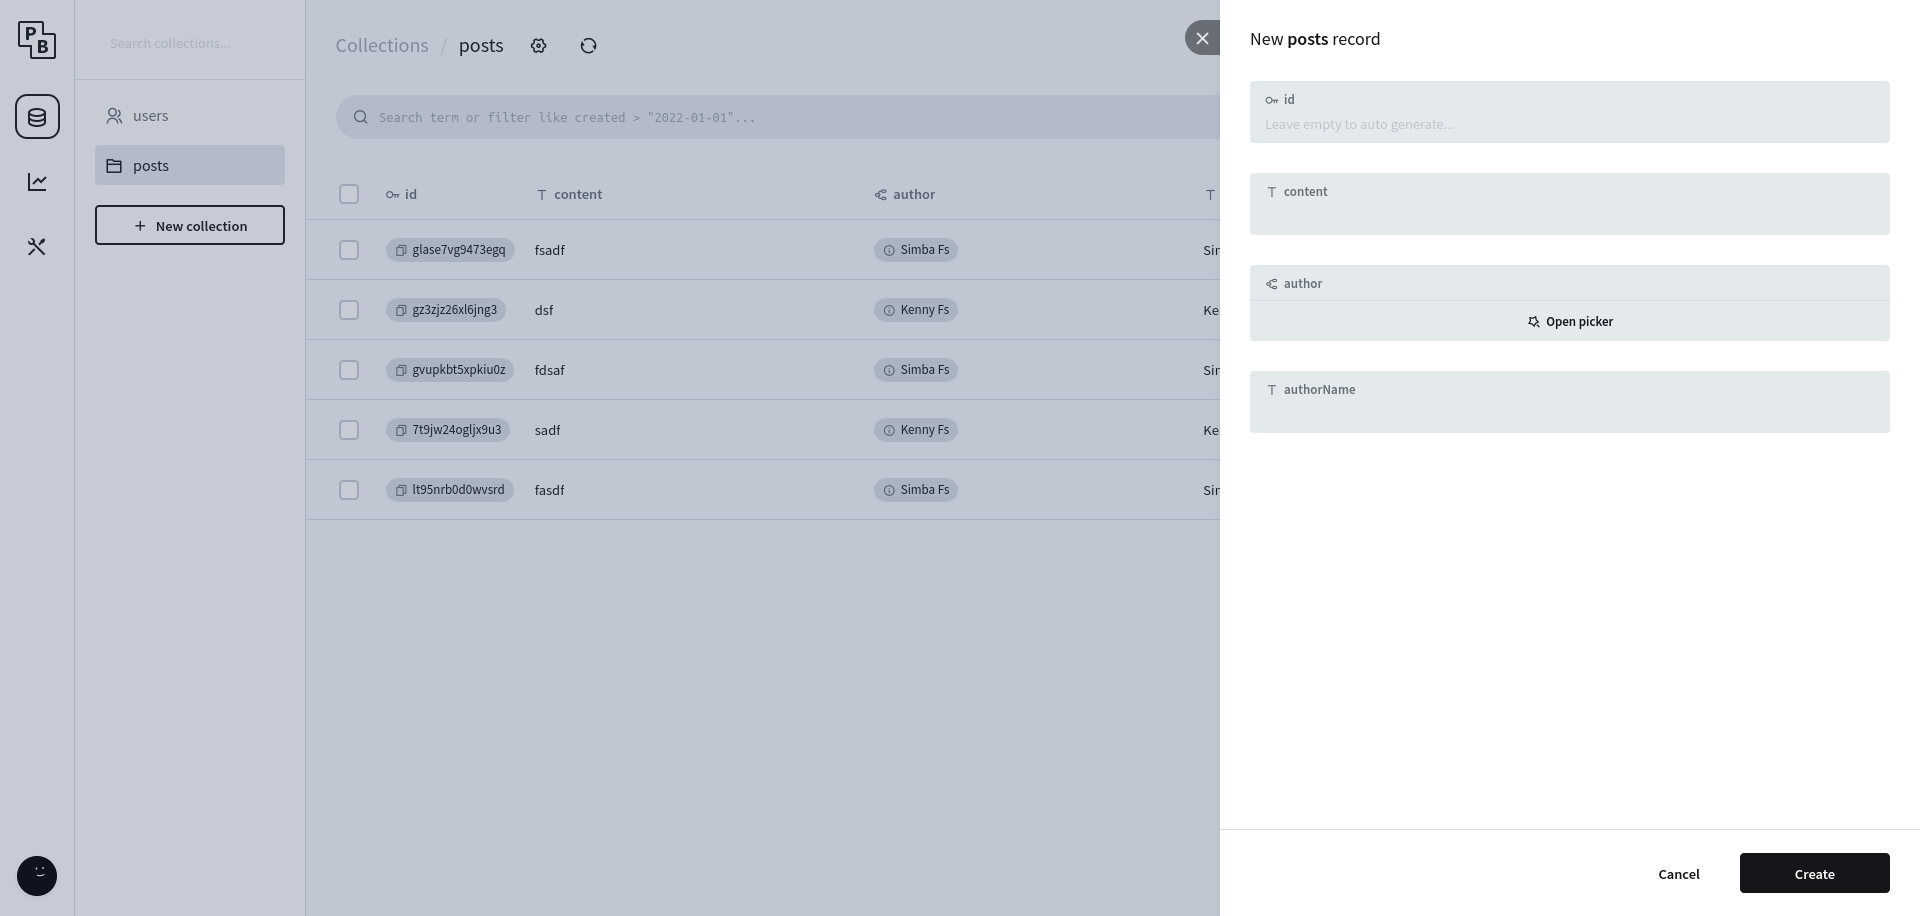
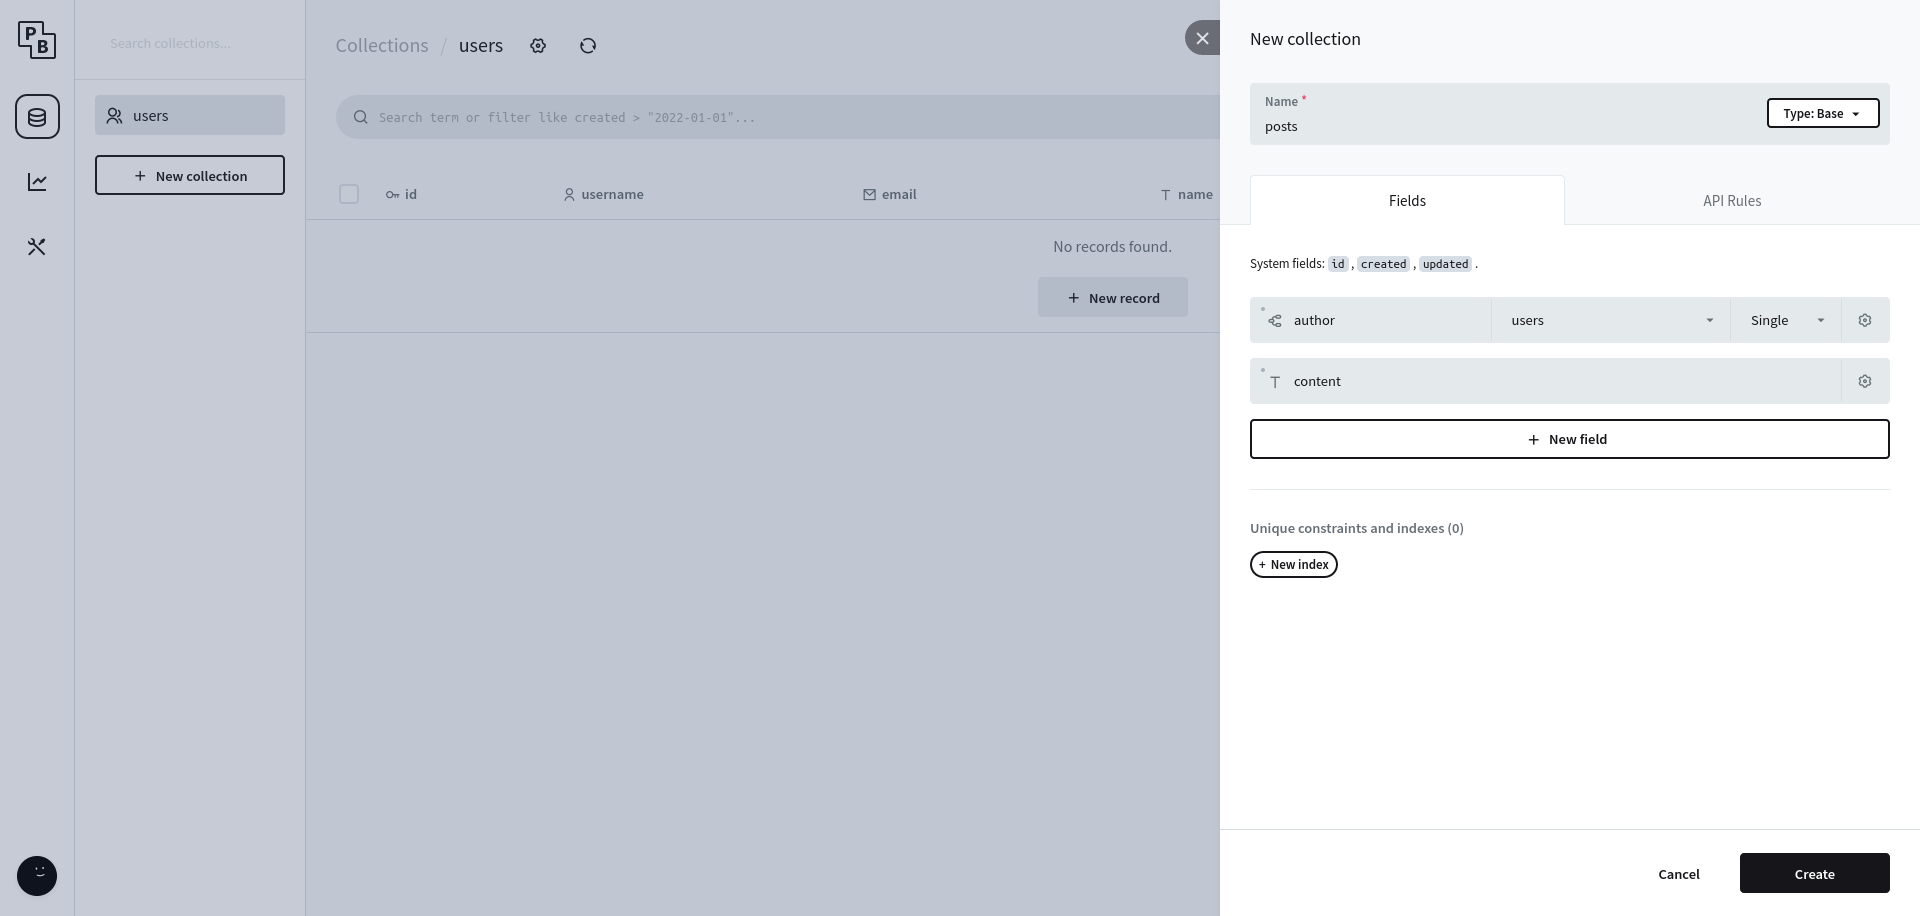
posts
接著建立新的 base collection,有 auther、content 兩個欄位,其中 author 是關聯到 users 表格,表示這邊文章是哪個使用者寫的,並且都設為非空。
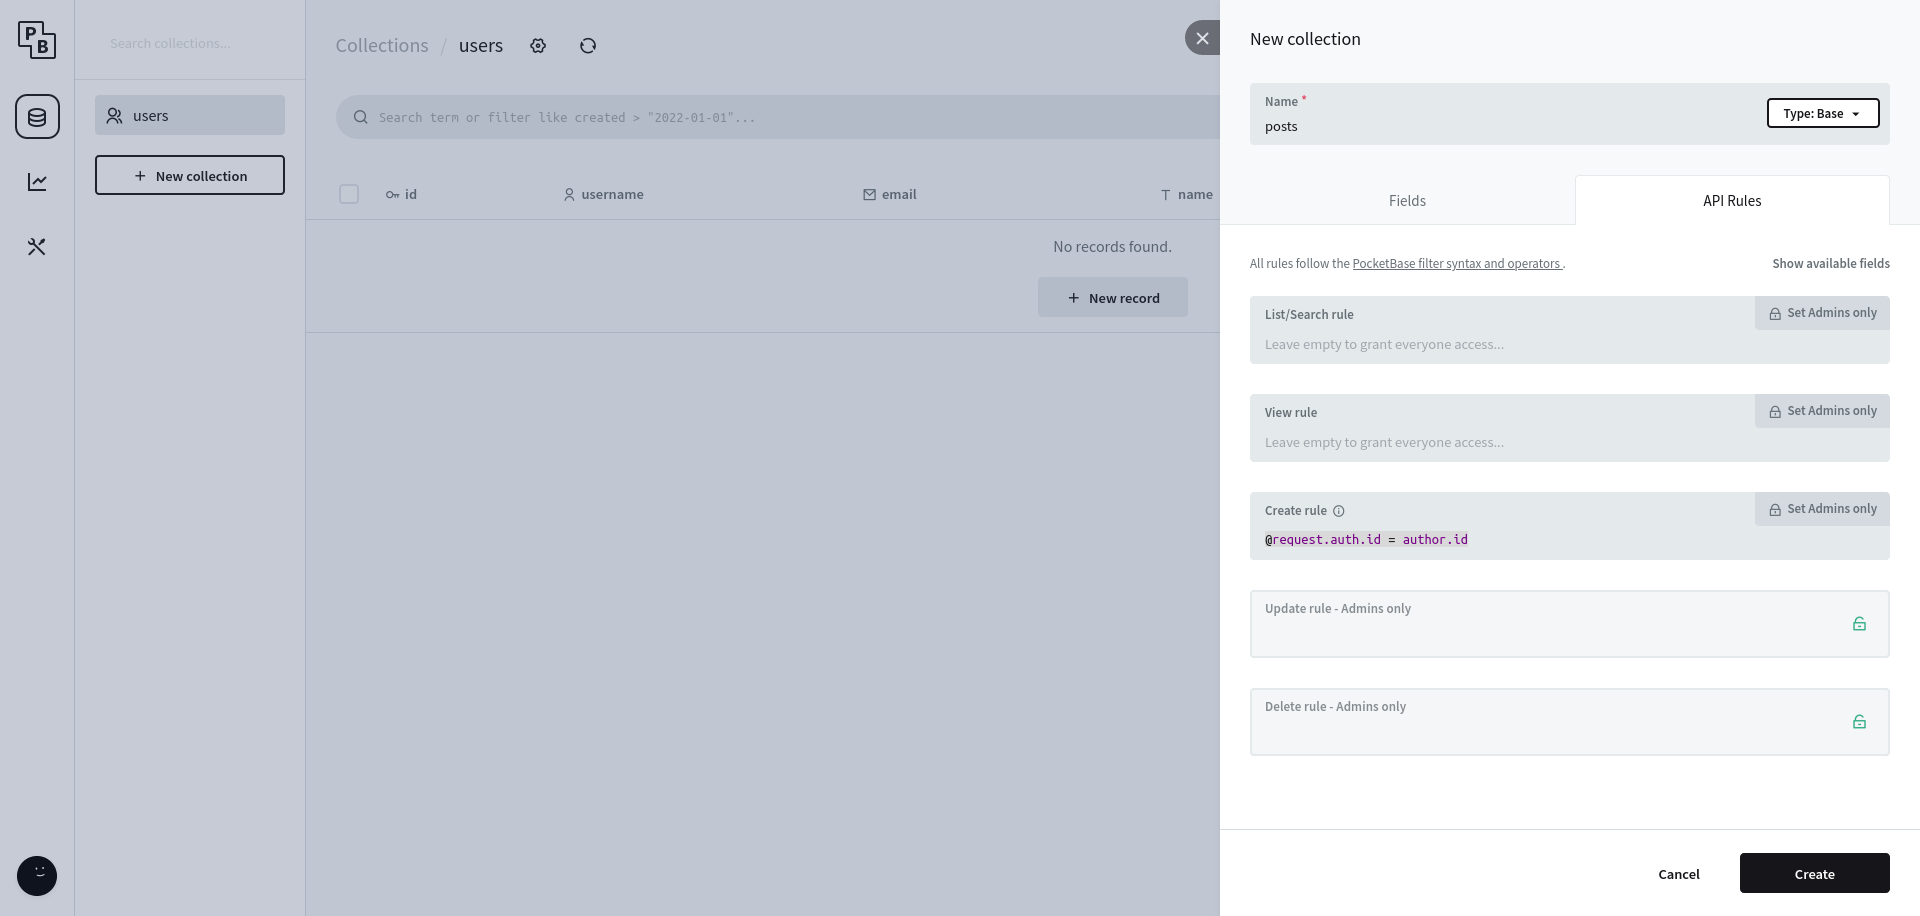
 接著我們設定存取權限,預設全部都是只開放管理員,但這太沒意思了,點
 list、view 和 create 的框框一下變成所有人都能存取,再來設定 create 的條件是 @request.auth.id = author.id,意思是發出請求的人跟 author 欄位的人必須是同一個人才行。剩下的有點麻煩我就先不做了
那麼我們的後端大致完成,可以去寫前端了
前端 JS SDK
pocketbase 官方有提供一個 JS SDK 可以使用,裝好後我們開一個 nextjs 專案,開啟 src/ 目錄、typescript 跟 tailwindcss。把預設的雜七雜八的東西刪掉後,我們從一個乾淨的 src/pages/index.tsx 開始。
登入
我們需要兩個框框一個按鈕來登入使用者帳號,input() 是 tailwindcss vairant,反正就是設定按鈕樣式而已
 1
 2
 3
 4
 5
 6
 7
 8
 9
10
11
12
13
14
15
16
17
18
19
20
21
22
23
24
25
26
27
28
29
30
31
32
33
| export default function Home() {
const [pb] = useState(new Pocketbase('http://localhost:8090'))
const [email, setEmail] = useState('')
const [password, setPassword] = useState('')
const handleLogin = () => {
pb.collection('users')
.authWithPassword(email, password)
.then(console.log, console.error)
}
return (
<div className="h-screen max-w-[800px] mx-auto flex flex-col">
<input
className={input()}
type="email"
value={email}
onChange={e => setEmail(e.target.value)}
placeholder="email"
/>
<input
className={input()}
type="password"
value={password}
onChange={e => setPassword(e.target.value)}
placeholder="password"
/>
<button className={input()} type="button" onClick={handleLogin}>
Login
</button>
</div>
)
}
|
pocketbase 會自動維護 authStore,預設是存在 localStorage 裡面,因此我們只有第一次要登入,第二次他其實會自動把 token 什麼的從 localStorage 抓出來,省了我們不少力氣
typescript
在開始抓資料前,我們來處理一下 typescript 的部份,如果這裡設定好,後面開發會輕鬆很多,有個工具叫做 pocketbase-typegen 可以自動根據 pocketbase 設定產生型別定義檔案,用指令 npx pocketbase-typegen --db ../pb_data/data.db --out src/pocketbase-type.ts 就會產生好我們要的檔案了。
裡面有幾種型別,第一類是 xxxRecord,這類是根據資料庫設定直接產出來的,再來是 xxxResponse,這個是 js-sdk 會吐給我們的,我們要用的也是這個
列出 post
我們寫一個 hook 來處理抓資料的工作
 1
 2
 3
 4
 5
 6
 7
 8
 9
10
11
12
| function usePosts(pb: Pocketbase) {
type Post = PostResponse
const [post, setPost] = useState<Post[]>([])
useEffect(() => {
pb.collection('posts')
.getList<Post>()
.then(result => setPost(result.items.reverse()))
}, [pb])
return posts
}
|
Subscribe
這個 hook 會在一開始就抓取全部的 posts,但是後續更新怎麼辦?pocketbase 提供 Subscribe,他會透過 websocket 或是 SSE 的方式把資料庫的更新即時通知前端,我們就修改一下上面的程式碼
 1
 2
 3
 4
 5
 6
 7
 8
 9
10
11
12
13
14
15
16
17
18
19
20
21
22
23
24
25
26
27
28
29
30
31
32
33
34
| function usePosts(pb: Pocketbase) {
type Post = PostsResponse
const [posts, updatePosts] = useReducer(
(state: Post[], action: Post | Post[]) => {
if (Array.isArray(action)) {
return action
}
return [action, ...state]
},
[]
)
useEffect(() => {
pb.collection('posts')
.getList<Post>()
.then(result => updatePosts(result.items.reverse()))
.then(() =>
pb.realtime.subscribe('posts', e => {
switch (e.action) {
case 'create':
updatePosts(e.record)
break
default:
console.log(e)
}
})
)
return () => {
pb.realtime.unsubscribe()
}
}, [pb])
return posts
}
|
這裡還有一個地方要注意,因為 nextjs 預設開啟嚴格模式,會導致 useEffect 在開發時會被執行兩次,也就是說你會 subscribe 兩次,而且似乎沒辦法關掉,唯一的方式是去 next.config.js 把 reactStrictMode 設成 false
顯示 posts
那麼,現在我們就有一個一開始會抓取所有 posts、會即時更新的 hook 啦,把他加進畫面裡吧
 1
 2
 3
 4
 5
 6
 7
 8
 9
10
11
12
13
14
15
16
17
18
19
20
21
22
23
24
25
26
27
28
29
30
31
32
33
34
35
36
37
38
39
40
41
42
| export default function Home() {
const [pb] = useState(new Pocketbase('http://localhost:8090'))
const [email, setEmail] = useState('')
const [password, setPassword] = useState('')
const posts = usePosts(pb)
const handleLogin = () => {
pb.collection('users')
.authWithPassword(email, password)
.then(console.log, console.error)
}
return (
<div className="h-screen max-w-[800px] mx-auto flex flex-col">
<input
className={input()}
type="email"
value={email}
onChange={e => setEmail(e.target.value)}
placeholder="email"
/>
<input
className={input()}
type="password"
value={password}
onChange={e => setPassword(e.target.value)}
placeholder="password"
/>
<button className={input()} type="button" onClick={handleLogin}>
Login
</button>
<hr />
{posts.map(item => (
<div className="m-2 p-2 border-2 border-stone-400 rounded-lg">
<p>{item.content}</p>
</div>
))}
</div>
)
}
|
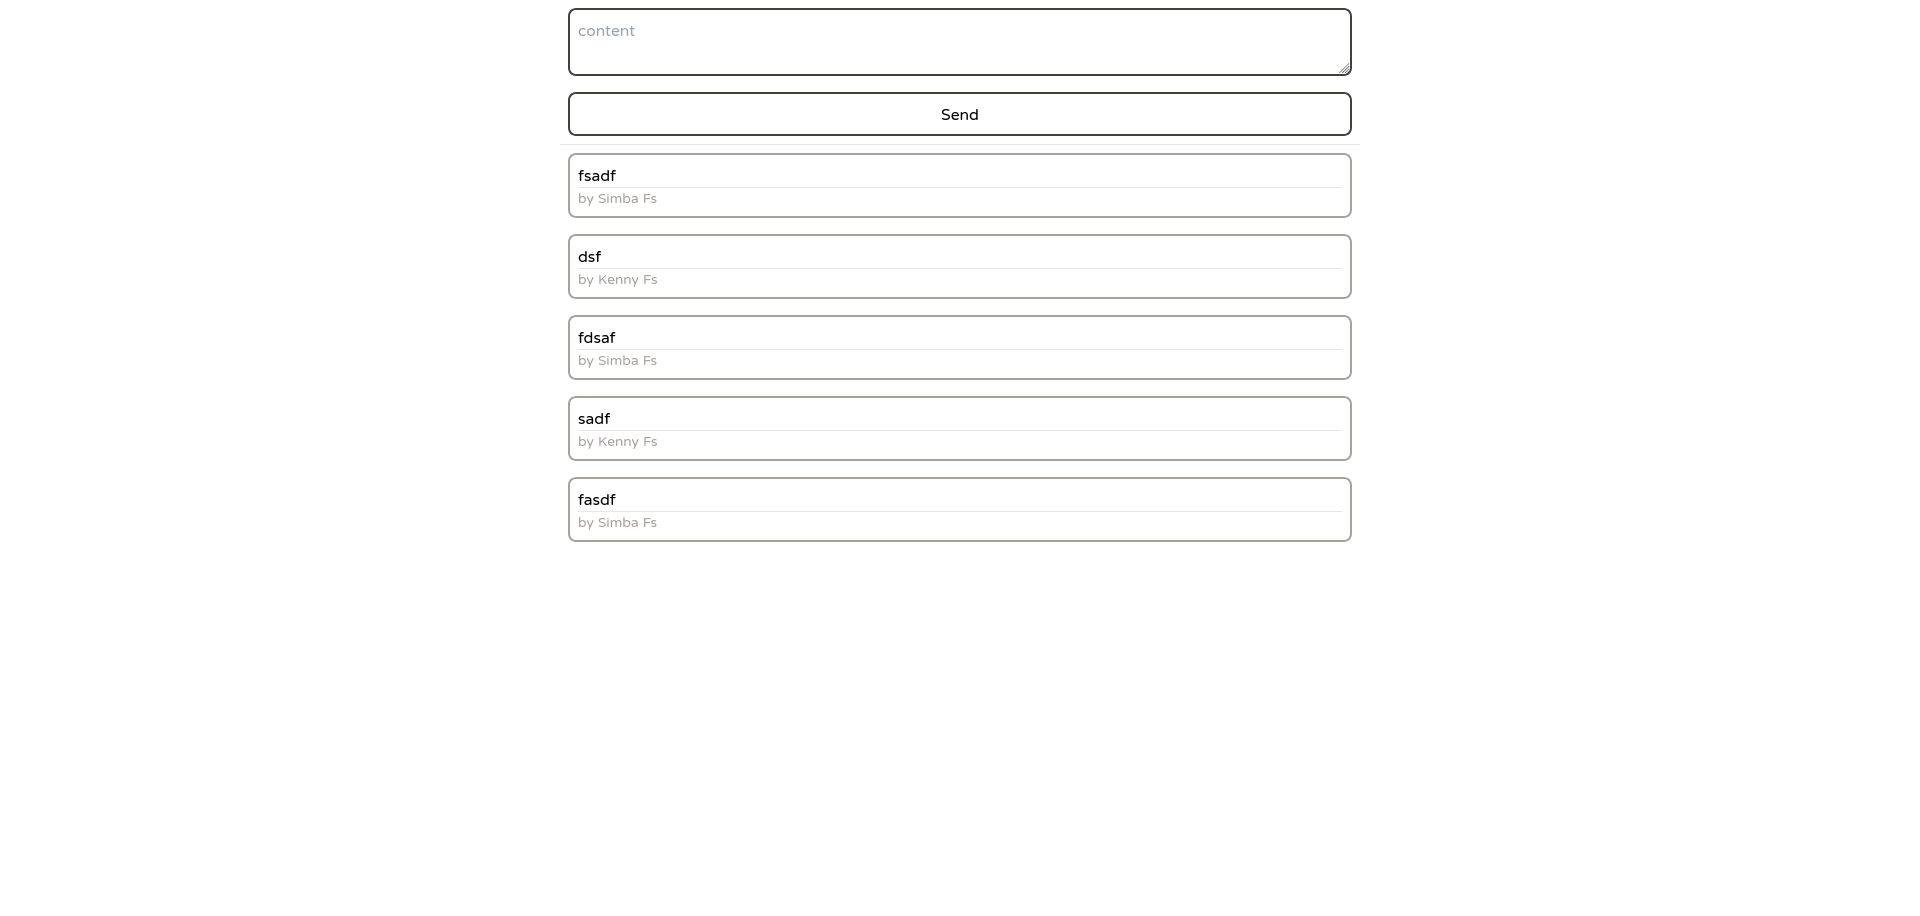
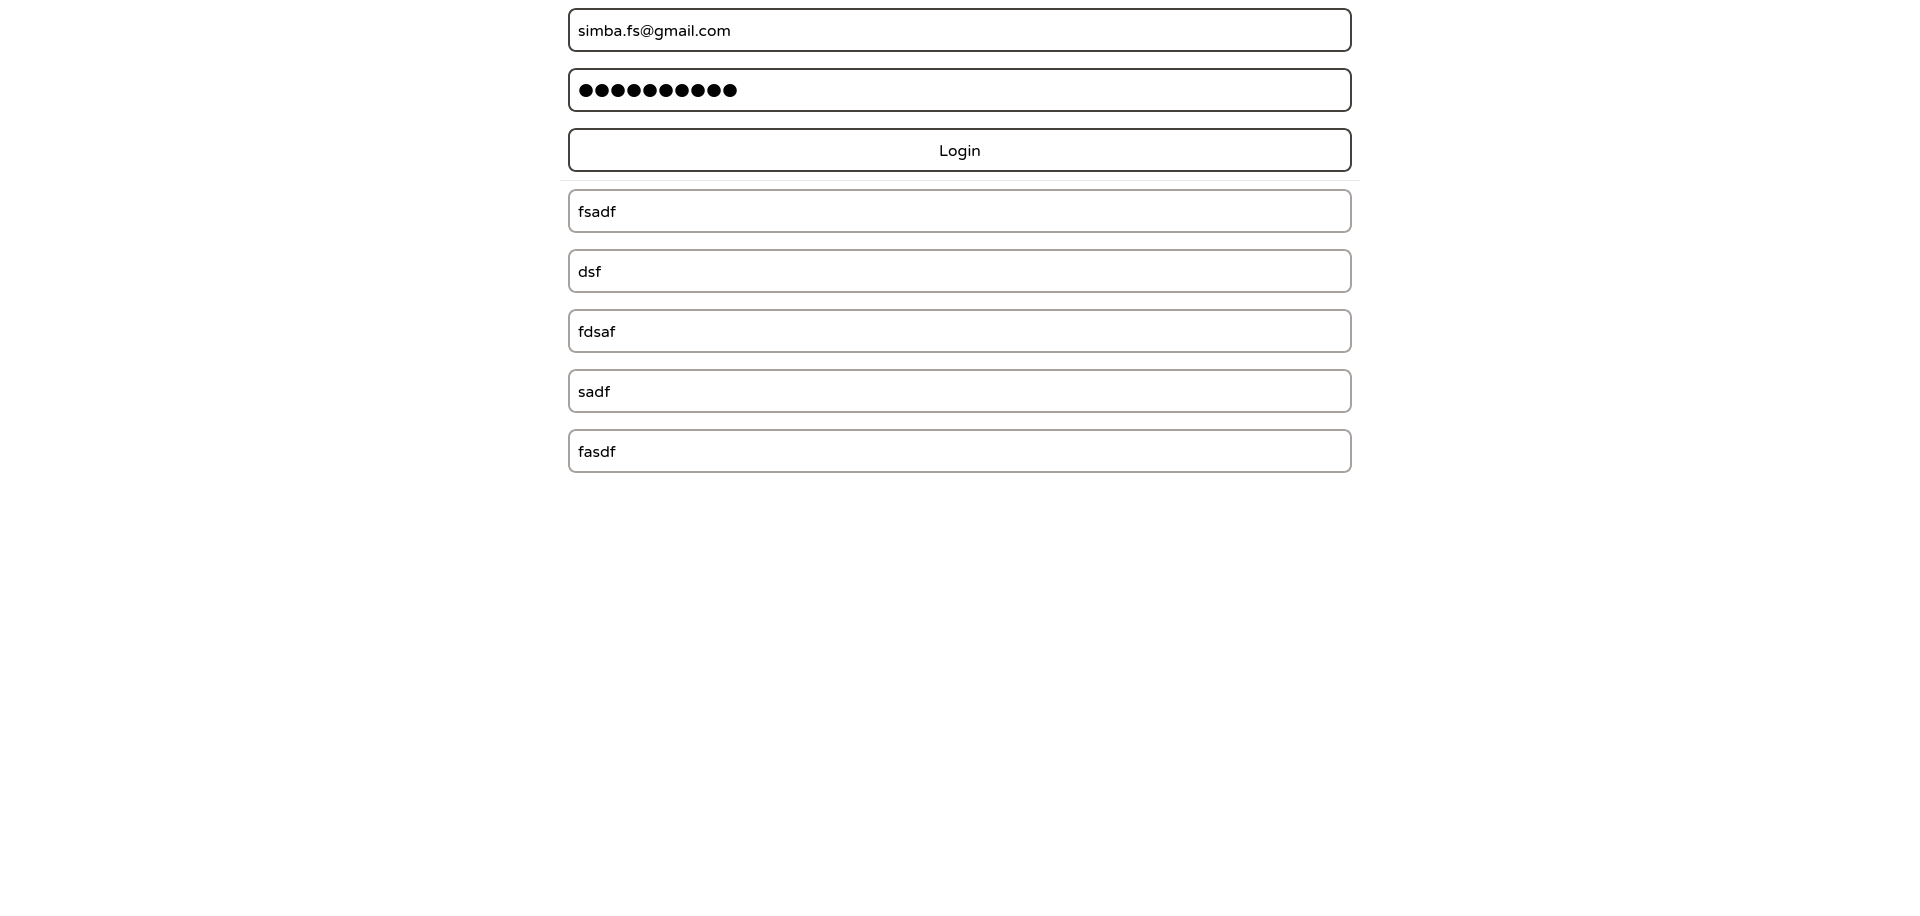
目前畫面長這樣
發文
發文就是去戳 post 的 create API,這部份也很簡單,加入一個 <textarea>,按下後把內容送出去就好,這部份長這樣
 1
 2
 3
 4
 5
 6
 7
 8
 9
10
11
12
13
14
15
16
17
18
19
20
21
22
23
24
25
| const [content, setContent] = useState('')
const handleSend = () => {
pb.collection('posts')
.create({
author: pb.authStore.model?.id,
content,
})
.then(() => setContent(''))
.then(console.log, console.error)
}
return (
<>
<textarea
className={input()}
value={content}
onChange={e => setContent(e.target.value)}
placeholder="content"
/>
<button className={input()} onClick={handleSend} type="button">
Send
</button>
</>
)
|
登入後隱藏
現在畫面上會有登入的兩個輸入框和一個按鈕,然後還有發文的框框和按鈕,問題是這兩個部份一個是未登入的時候才需要顯示,一個是已登入才能顯示,所以我們需要一個判斷有沒有登入的方法,最簡單就是判斷 pb.authStore.token !== '',但這會遇到一個問題,就是 nextjs 會做 hydration,伺服器看起來沒有登入(一定不會有 token),所以顯示登入框框,但是在瀏覽器一開始 pocketbase 就會很好心幫我們載入 authStore,所以顯示發文框框,這樣會跳 hydration error,所以需要動點手腳
 1
 2
 3
 4
 5
 6
 7
 8
 9
10
11
12
13
14
15
16
17
18
19
20
21
22
23
24
25
26
27
28
29
30
31
32
33
34
35
36
37
38
39
40
| const [isLogin, setIsLogin] = useState(false)
// prevent dom tree not the same in server and client, which will cause hydration error
useEffect(() => setIsLogin(pb.authStore.token !== ''), [pb.authStore.token])
return {
isLogin ? (
<>
<textarea
className={input()}
value={content}
onChange={e => setContent(e.target.value)}
placeholder="content"
/>
<button className={input()} onClick={handleSend} type="button">
Send
</button>
</>
) : (
<>
<input
className={input()}
type="email"
value={email}
onChange={e => setEmail(e.target.value)}
placeholder="email"
/>
<input
className={input()}
type="password"
value={password}
onChange={e => setPassword(e.target.value)}
placeholder="password"
/>
<button className={input()} type="button" onClick={handleLogin}>
Login
</button>
</>
)
}
|
加上作者
基本上已經完成了,但是我還想加上顯示這篇文章的作者是誰,會用到 js-sdk 的 expand 功能,修改 usePosts 函數,這裡因為 subscribe 好像沒有 expand 選項可以加,所以再額外發一個 api call 去抓有 expand 的資料
 1
 2
 3
 4
 5
 6
 7
 8
 9
10
11
12
13
14
15
16
17
18
19
20
21
22
23
24
25
26
27
28
29
30
31
32
33
34
35
36
37
38
39
40
41
42
43
| function usePosts(pb: Pocketbase) {
type Post = PostsResponse<{
author: UsersResponse
}>
const [posts, updatePosts] = useReducer(
(state: Post[], action: Post | Post[]) => {
if (Array.isArray(action)) {
return action
}
return [action, ...state]
},
[]
)
useEffect(() => {
pb.collection('posts')
.getList<Post>(1, 50, {
expand: 'author',
})
.then(result => updatePosts(result.items.reverse()))
.then(() =>
pb.realtime.subscribe('posts', e => {
switch (e.action) {
case 'create':
// updatePosts(e.record)
pb.collection('posts')
.getOne<Post>(e.record.id, {
expand: 'author',
})
.then(e => updatePosts(e))
break
default:
console.log(e)
}
})
)
return () => {
pb.realtime.unsubscribe()
}
}, [pb])
return posts
}
|
顯示文章的地方就改成這樣
 1
 2
 3
 4
 5
 6
 7
 8
 9
10
11
| {
posts.map(item => (
<div className="m-2 p-2 border-2 border-stone-400 rounded-lg">
<p>{item.content}</p>
<hr />
<p className="text-sm text-stone-400">
by {item.expand?.author.name}
</p>
</div>
))
}
|
權限
目前看起來很棒,但是你會發現用其他帳號登入的話就會 expand 就會失敗,是因為預設的 users collection list 和 view 都是只有自己才能看,所以我們需要把他刪掉變成空字串,這樣才可以讓其他人也抓到 expand
最後成果
程式碼可以在 這裡 找到